
In this post we will try to understand the basics of Claims Based Authentication in SharePoint.
Lets start this with Claims.
Let me put it in a simple way for better understanding. If there is a carnival with entrance fee of 100 bucks and all the rides inside are free. When you enter carnival, you pay once and have the ticket with you. Now every time you get on a ride, you just need to show that entrance ticket. The person operating rides will trust the ticket granted by person near entrance.
So, Entrance ticket is the claim you carry.
Claims based authentication is a new feature introduced by SP2010. We already have classic authentication, so why claims?
Classic authentication works on AD groups. Just imagine for a public facing site, how many AD Group additions need to be done up on user requests.
Secondly, it is for a point to point communication. The security cannot span beyond one application pool.
But in case of claims, it has ability to grant a security token which can authenticate user for all the application which mutually agrees with a System granting security tokens for authenticated users. This granting system generally refers as STS (Security Token System).
Most people jump to decision of using ADFS or some other STS with claims based authentication in SharePoint. Well the user have option to have flexibility of claims even on Windows or Forms based Authentications. You can see all these options while creating a SharePoint Web application.

Understanding the Windows Authentication Process

 Source : MSDN
Find the DEMO in my next post. Demo - Claims Based Authentication.
Lets start this with Claims.
Claim is a piece of information which will authenticate you with in a set of agreed parties.
Let me put it in a simple way for better understanding. If there is a carnival with entrance fee of 100 bucks and all the rides inside are free. When you enter carnival, you pay once and have the ticket with you. Now every time you get on a ride, you just need to show that entrance ticket. The person operating rides will trust the ticket granted by person near entrance.
So, Entrance ticket is the claim you carry.
Claims based authentication is a new feature introduced by SP2010. We already have classic authentication, so why claims?
Classic authentication works on AD groups. Just imagine for a public facing site, how many AD Group additions need to be done up on user requests.
Secondly, it is for a point to point communication. The security cannot span beyond one application pool.
But in case of claims, it has ability to grant a security token which can authenticate user for all the application which mutually agrees with a System granting security tokens for authenticated users. This granting system generally refers as STS (Security Token System).
Most people jump to decision of using ADFS or some other STS with claims based authentication in SharePoint. Well the user have option to have flexibility of claims even on Windows or Forms based Authentications. You can see all these options while creating a SharePoint Web application.

Understanding the Windows Authentication Process

- The user requests a SharePoint 2010 resource.
- User authentication (NTLM challenge/Kerberos negotiation) occurs.
- The claims-based token request is sent to the SharePoint 2010 STS.
- SharePoint STS gets the user's security groups from the Windows token and adds them as user claims in the token.
- The SharePoint STS gets additional claims for the user (if an additional claims provider is registered for that web application/zone).
- The claims-based token is issued.
- The request is processed by the rest of the components in the pipeline.
- The response is sent back to the user.

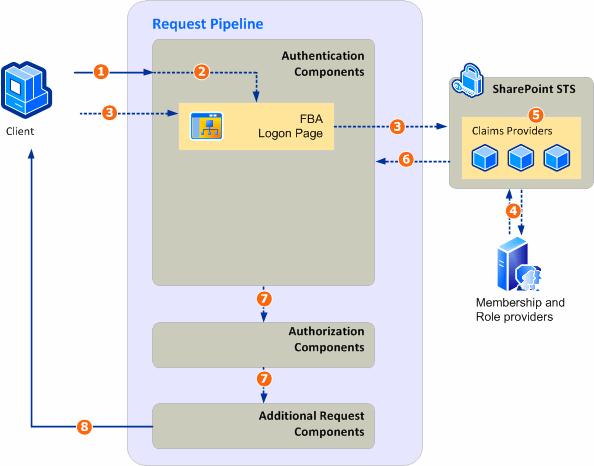
- The user requests a SharePoint 2010 resource.
- SharePoint redirects the user to the forms-based authentication login page.
- The username and password are collected from the user and sent to the SharePoint 2010 STS.
- STS validates the user's credentials with the membership provider and, if validation succeeds, STS requests all the roles that the user belongs to and adds those claims to the user's token.
- The SharePoint STS gets additional claims for the user (if an additional claims provider is registered for that web application/zone).
- The claims-based token is issued to the user.
- The request is processed by the rest of the components in the pipeline.
- The response is sent back to the user.

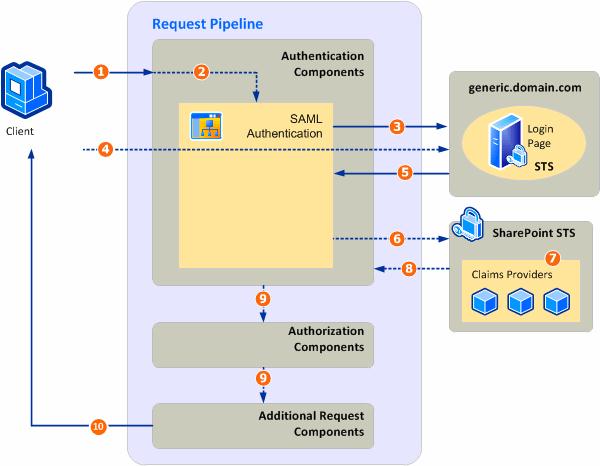
- The user requests a SharePoint 2010 resource.
- SharePoint redirects the user to the SAML authentication page.
- Based
on the configuration of the trusted login provider, the request is
redirected to the enterprise STS login page or to the federated STS
login page.
- The user provides credentials and STS issues a SAML claims-based token.
- The external STS issues the user claims-based token.
- A
claims-based token for the user is requested from the SharePoint STS,
and the token from the external STS is used as the authentication proof.
- SharePoint
STS gets additional claims for the user (if an additional claims
provider is registered for that web application or zone).
- SharePoint STS issues the claims-based token.
- The request is processed by the rest of the components in the pipeline.
- The response is sent back to the user.
Find the DEMO in my next post. Demo - Claims Based Authentication.
No comments:
Post a Comment