
These are the list of issues I encounter while working on SP 2013 on VS 2012.
While setting up SharePoint 2013 in standalone mode, there are 2 kinds of errors which we may encounter at step8.
Just like many people I ignored it and verified Central Admin and created an application. So thought everything is working. But when you create applications like apps, then you will start getting weird errors like "xxxxxx component is missing, try installing it again"
So clear these issues first and then proceed.
One or more configurations settings failed.
Failed to create the configuration database.
An exception of type System.Management.Automation.CmdletInvocationException was thrown. Additional exception information: ErrorCode<NonDomainNWService>:SubStatus<ES0001>:Service running under Network Service account in workgroup environment is not supported.

Resolution:
Use ‘CMD’
Go to the location:
C:\Program Files\Common Files\microsoft shared\Web Server Extensions\15\bin
and run: psconfig.exe -cmd Configdb create SkipRegisterAsDistributedCacheHost

Re-run the configuration wizard and you should get rid of above problem.
Failed to create sample data
An exception of type System.ArgumentException was thrown. Additional exception information: The SDDL string contains an invalid sid or a sid that cannot be translated.
Parameter name: sddlForm
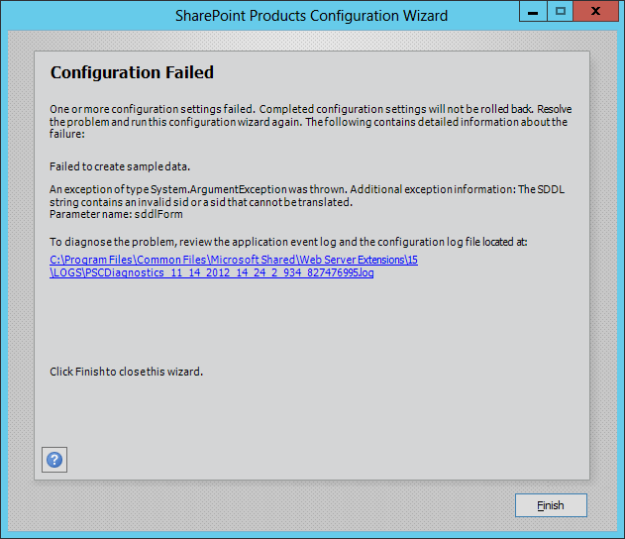
Resolution:
This sure looks like a rough patch work to do, but trust me it worked for many people and for me as well.
At last . . .

Configuration is successfully Completed. :)
"An error occurred while trying to load some required components. Please ensure that the following prerequisite components are installed:
Microsoft Web Developer Tools
Microsoft Exchange Web Services"
When you verify you have all these components installed, yet you will be getting this error.
Resolution:
Unintall Web exchange service instances.
Unintall Microsoft Office Developer Tools.
Now using "Webplatform Installer", install both and it will work this time.
Have fun :)
"Error 4 Error occurred in deployment step 'Install app for SharePoint': Failed to install app for SharePoint. Please see the output window for details.
0 0 ClaimsApp"
Resolution:
After you create your isolated app domain, perform the steps in the following procedure to add that domain to your bypass list in Internet Explorer. This ensures that you can navigate to this domain after you deploy a SharePoint-hosted app. You can skip this procedure if your environment does not use a proxy server.
For more issues encountered while working with apps, please refer to my post
"My First Sharepoint-Hosted App in 2013"
While setting up SharePoint 2013 in standalone mode, there are 2 kinds of errors which we may encounter at step8.
Just like many people I ignored it and verified Central Admin and created an application. So thought everything is working. But when you create applications like apps, then you will start getting weird errors like "xxxxxx component is missing, try installing it again"
So clear these issues first and then proceed.
Problem #1Configuration Failed
One or more configurations settings failed.
Failed to create the configuration database.
An exception of type System.Management.Automation.CmdletInvocationException was thrown. Additional exception information: ErrorCode<NonDomainNWService>:SubStatus<ES0001>:Service running under Network Service account in workgroup environment is not supported.

Resolution:
Use ‘CMD’
Go to the location:
C:\Program Files\Common Files\microsoft shared\Web Server Extensions\15\bin
and run: psconfig.exe -cmd Configdb create SkipRegisterAsDistributedCacheHost

Re-run the configuration wizard and you should get rid of above problem.
Problem #2Configuration Failed
Failed to create sample data
An exception of type System.ArgumentException was thrown. Additional exception information: The SDDL string contains an invalid sid or a sid that cannot be translated.
Parameter name: sddlForm

Resolution:
This sure looks like a rough patch work to do, but trust me it worked for many people and for me as well.
- Log in as the built-in Administrator account
- Create a new user account for the Search Service
- Add the new Search Service account to the local WSS_ADMIN_WPG group
- Open up SharePoint Management Shell and enter the following:
- $SearchService = Get-Credential "MachineName\AccountName"
- Hit enter and then enter the account's password
- New-SPManagedAccount -Credential $SearchService
- Launch Central Administration (do this as the built-in Admin account because for some reason, other accounts in the local Administrators group are not showing up options in Central Administration, even if in the Farm Administrators group).
- Go to Security, Service Accounts, and change the Search Service to the new managed account
- Go to "C:\Program Files\Microsoft Office Servers\15.0\Data\Office Server" and find the directory that starts with Analytics. It should be "Analytics_<GUID>".
- Right-click, Properties, Sharing, and click Advanced Sharing
- Check the "Share this folder' checkbox, leave the Share name alone and click on Permissions
- Leave Everyone having Read (for now), Add the Search Service account you created and select Full Control. Do the same and add WSS_ADMIN_WPG with Full Control. Click OK.
- Run the SharePoint Configuration Wizard again. It should move on to step 9, then 10 and finish.
At last . . .

Configuration is successfully Completed. :)
Problem #3Now when you installed Visual Studio 2012 and All required Office tools using "Web Platform Installer", but some times when you create App for SharePoint , it may create empty project and say
"An error occurred while trying to load some required components. Please ensure that the following prerequisite components are installed:
Microsoft Web Developer Tools
Microsoft Exchange Web Services"
When you verify you have all these components installed, yet you will be getting this error.
Resolution:
Unintall Web exchange service instances.
Unintall Microsoft Office Developer Tools.
Now using "Webplatform Installer", install both and it will work this time.
Have fun :)
Problem #4When you create the SharePoint hosted App and tried to deploy, the deployment may fail saying:
"Error 4 Error occurred in deployment step 'Install app for SharePoint': Failed to install app for SharePoint. Please see the output window for details.
0 0 ClaimsApp"
Resolution:
Create an isolated app domain on your development computer
- Ensure that the spadmin and sptimer services are running by opening a command prompt and typing the following commands.
net start spadminv4
net start sptimerv4
- Create your isolated app domain by running the SharePoint Management Shell as an administrator and typing the following command.
Set-SPAppDomain "your app domain"
- Ensure that the SPSubscriptionSettingsService and AppManagementServiceInstance services are running by typing the following command in the SharePoint Management Shell.
Get-SPServiceInstance | where{$_.GetType().Name -eq "AppManagementServiceInstance" -or $_.GetType().Name -eq "SPSubscriptionSettingsServiceInstance"} | Start-SPServiceInstance
- Verify that the SPSubscriptionSettingsService and AppManagementServiceInstance services are running by typing the following command in the SharePoint Management Shell. The output will indicate whether each service is online.
Get-SPServiceInstance | where{$_.GetType().Name -eq "AppManagementServiceInstance" -or $_.GetType().Name -eq "SPSubscriptionSettingsServiceInstance"}
- You must specify an account under which the SPSubscriptionService and AppManagementServiceInstance service instances will run. This account must be an SPManagedAccount. You can create an SPManagedAccount by typing the following command in the SharePoint Management Shell. (You’ll be prompted for the account domain\user and password.)
$account = New-SPManagedAccount
- Specify an account, application pool, and database settings for the SPSubscriptionService and AppManagementServiceInstance services by typing the following code in the SharePoint Management Shell. If you created a SPManagedAccount in the preceding step, use that account name here.
$account = Get-SPManagedAccount "domain\user"
$appPoolSubSvc = New-SPServiceApplicationPool -Name SettingsServiceAppPool -Account $account
$appPoolAppSvc = New-SPServiceApplicationPool -Name AppServiceAppPool -Account $account
$appSubSvc = New-SPSubscriptionSettingsServiceApplication –ApplicationPool $appPoolSubSvc –Name SettingsServiceApp –DatabaseName SettingsServiceDB
$proxySubSvc = New-SPSubscriptionSettingsServiceApplicationProxy –ServiceApplication $appSubSvc
$appAppSvc = New-SPAppManagementServiceApplication -ApplicationPool $appPoolAppSvc -Name AppServiceApp -DatabaseName AppServiceDB
$proxyAppSvc = New-SPAppManagementServiceApplicationProxy -ServiceApplication $appAppSvc
- Specify your tenant name by typing the following code in the SharePoint Management Shell.
Set-SPAppSiteSubscriptionName -Name "app" -Confirm:$false
For more issues encountered while working with apps, please refer to my post
"My First Sharepoint-Hosted App in 2013"
Thanks for the post, very helpful!
ReplyDeleteOne note, if you are installing 2013 Foundation, then the location for problem #2 is C:\Program Files\Windows SharePoint Services\15.0\Data.
Thanks!!!
ReplyDelete